Work order Completion Form
The work order completion form can be accessed from the majority of scan forms by clicking the ‘chequered flag icon on the same row as the required work order.
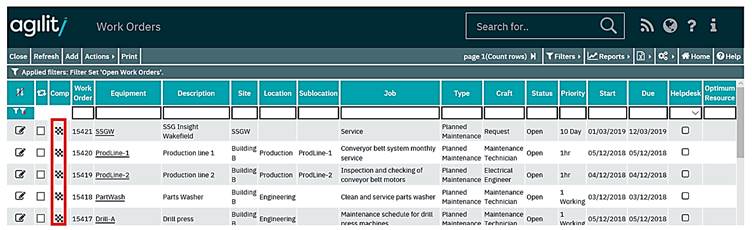
Although this method can be used to complete multi-task work orders the form only displays details of the main or first task on the work order. If during the completion process details need to be added to multiple tasks it is recommended that completion is done using the work order detail form in change mode.
When the completion form opens the top portion of the form contains pre-populated work order data. The lower portion contains a series of tabs for the recording of transactions against the first or main task on the work order.
Completion data
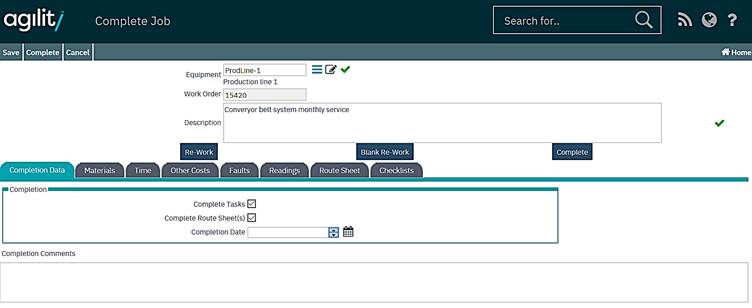
The completion data tab contains the main completion data about the job, times, comments and breakdown details if the work order was of a break down job type.
Non Breakdown Work Order;
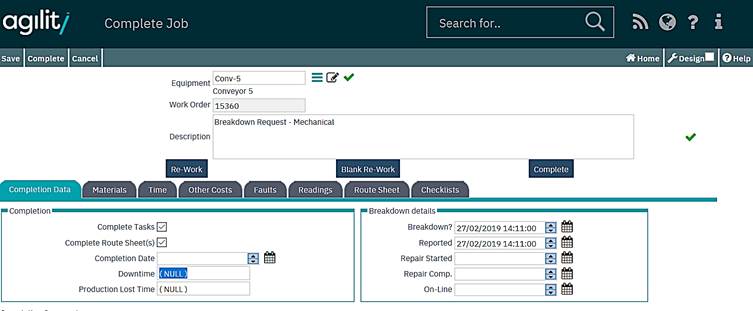
Breakdown Work order;
Complete Tasks (check box)
If this check box is ticked, then all the tasks in the Work Order will be completed at once. By default, this box is checked. Un-check this box if the Work Order contains multiple tasks which are not completed simultaneously. All tasks must be completed before a Work Order can be completed.
Route Items (check box)
If this check box is ticked, then all the Route Sheet Items in the Work Order will be completed at once. By default, this box is checked. Un-check this box if the Work Order contains multiple Route Sheet Items which are not completed simultaneously. All Route Sheet Items must be completed before a Work Order can be completed.
Down Time (Breakdown Work Order Only)
To specify the amount of time the equipment was offline during the repair.
Production Lost Time (Breakdown Work Order Only)
This is to specify the overall amount of lost production time which may differ to the down time.
Downtime and production lost time are only accessible when the work order uses a breakdown work order type.
Completion Comments
Details of what was done to repair the item. This should be comprehensive enough for anyone to see and understand the actions taken.
Breakdown Type Work Order Key dates (Breakdown Work Order Only)
Breakdown Date
This is the date/time when the breakdown occurred
Reported
This the date/time when the breakdown was reported
Repair Started
This is a date / time that the repair was started.
Repair Completed
This is a date / time that the repair was completed.
On-Line Date
This is a date / time that the Equipment was deemed to be on-line and operational.
Materials Tab
This screen allows for the addition of items, from the Inventory Stores, that have been used in carrying out the work indicated by the work order.
Existing items that have already been added will be displayed.
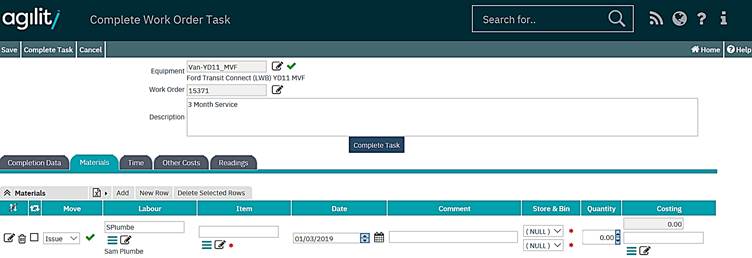
Move
The type of movement, i.e. an issue or return
Labour
Labour code of an employee if the item was issued directly to an employee.
Item
The Item field is mandatory. Click on the help icon to display a list of inventory items within the Store that was selected in the Movement header. Click on the green tick to select the desired item.
Date
This date represents the date that the inventory items were return or issued.
Comment
This free-text box allows for any comments regarding the inventory item entry to be recorded.
Store
This is the Store from which the inventory item was taken. The default store is always selected in the Store field. This can be amended via the drop-down list within the field.
Bin (Bin Location)
The Bin (Bin Location) records the main Bin details for this movement. Click on the help icon to display a list of Bin Locations that hold the inventory item within the selected Store.
Quantity
The Quantity field signifies the quantity of stock moved in this movement.
Cost
The Cost Value (Line Value) is automatically calculated based upon Quantity x unit cost, representing the total value for this movement.
Cost Code
A cost code against which the material cost is applied.
Once the inventory Movement Line has been populated, click on ok to return to the Inventory Movement record. The Movement is shown in the Movement Lines grid.
For further details on how to input an Inventory movement, please refer to the Inventory Movement section in this document
Time Tab
Time transactions are recorded for all employees, who have been involved in carrying out the work indicated by the work order and against the main or first task on the work order. Previously added or recorded time transactions against the main or first task on the work order will be displayed here.
Labour
The Labour can be selected from the help scan or entered manually. This represents the Labour Resource against whom time is to be logged against. This does not have to be the Labour Resource who to whom the task was originally scheduled. Multiple time transaction for different or the same employees can be added.

(Above shows new row within time grid)
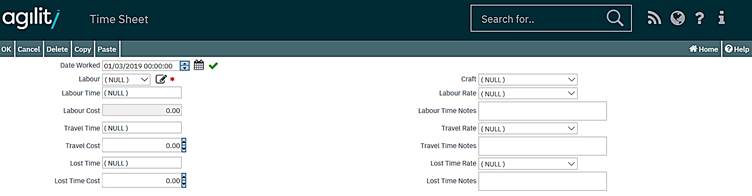
(Above shows new time transaction entry form, from ‘add button’)
Field Definitions;
Craft
As Labour Resources can have several crafts, it is necessary to record in this field the craft under which they carried out the work.
Date Worked
This is the date when the work against this task was conducted.
Labour Time
Labour time is recorded in hours and minutes and signifies the amount of time the spent working on the task.
Labour Time Notes
This is a free format field to enable any relevant notes to be added.
Labour Rate
The Labour Rate can be selected from the drop down list. This is the Labour Cost Rate that is to be applied for this time allocation.
Labour Cost
The Labour Cost will be calculated automatically based upon values entered in the Labour Time and Labour Rate fields. The Labour Cost cannot be manually adjusted.
Travel Time
Travel time is recorded in hours and minutes and signifies the amount of time the employee spent travelling before being able to begin work on the task.
Travel Rate
The Travel Rate can be selected from the drop down list. This list is populated with the Travel Pay Rates and represents is the Rate that is to be used for this time allocation.
Travel Cost
The Travel Cost will be calculated automatically based upon values entered in the Travel Time and Travel Rate fields. The Travel cost cannot be manually adjusted.
Travel Time Notes
This is a free format field to enable any relevant notes to be added.
Lost Time
Lost time is recorded in hours and minutes and signifies the amount of time that was lost whilst working on the task. An example of lost time is where an employee has had to wait in order to gain access to a building.
Lost Time Rate
The Lost Time Rate can be selected from the drop down list. This list is populated with the Lost Time Pay Rates and represents is the Rate that is to be used for this time allocation.
Lost Time Cost
The Lost Time Cost will be calculated automatically based upon values entered in the Lost Time and Lost Time Rate fields. The Lost Time cost cannot be manually adjusted.
Lost Time Notes
This is a free format field to enable any relevant notes to be added.
Labour Time can be allocated against tasks by clicking on the Add button. This will open the Time Entry Screen (as described in the section Labour Time Entry (Rapid Time Sheet entry) in a previous section of this document).
Other Costs Tab
This screen allows for the addition of other costs that have been incurred in carrying out the work indicated by the work order. Other cost transactions actions previously recorded against the main or first task of this work order will be displayed here.
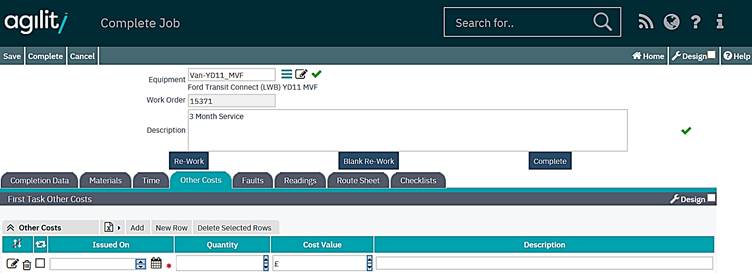
(Above shows new row within time grid)
Field Definitions;
Issued On
Enter the date that the cost was accrued.
Quantity
Enter the quantity involved.
Code
This is a free text field to provide a code for the cost.
Description
This is a free text field to provide a description for the cost.
Quantity
Enter a relevant quantity, if appropriate.
Cost Value
Enter the actual cost in this field.
Sell Value
If the cost is to be re-charged, enter the selling value in this field.
Faults Tab
Any fault for this work order can be record within this tab. Any faults previously recorded against this work order will already be displayed here.
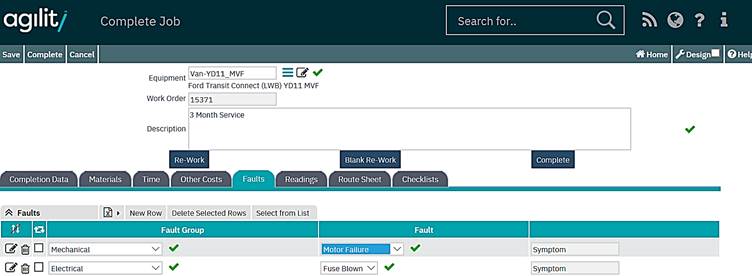
To add faults click the select from list option. This will open a multi select grid of available faults that can be selected. Click the check box of the fault(s) that need to be added to the work order using the selection check boxes.
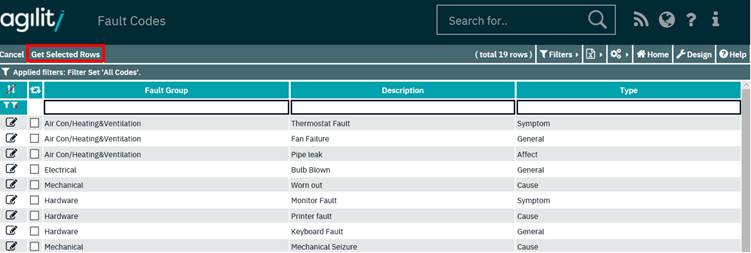
Once the selection has been made click the ‘get selected rows’ option to return the selected rows back to the grid.
Readings Tab
This tab details any reading points associated with the equipment that the current task has been raised against. Reading taken as part of the task can be recorded here.
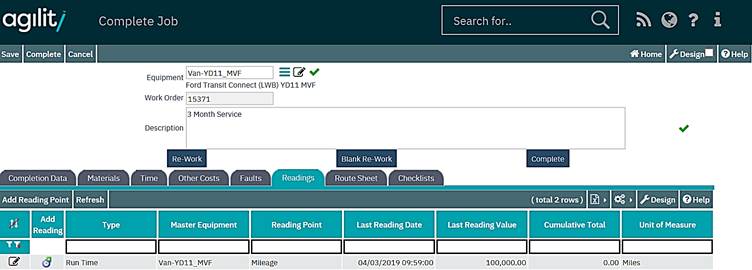
For more information on adding readings please refer the ‘equipment reading point’ topic in the equipment chapter.
Route Sheets Tab
If the work order contains route sheets they will be listed here. All of the route sheet items can be marked as complete in one action by checking the ‘Complete Route Sheets’ flag on the Work Order Completion Tab.
If completion comments are required for the individual route sheet items, additional comment cn be added in the comment completion section for each route sheet.
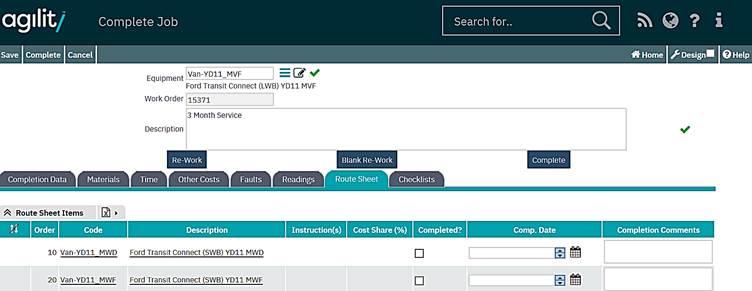
Field Definitions;
Item Order
The Item Order will be generated automatically however this can be manually adjusted to record the order in which the route sheet items should be dealt with.
Equipment
This is the equipment code of the item to be added to the list.
Description
The full descriptive name of the equipment item
Instructions
Instruction specific to this individual route sheet item
Costing Share (%)
The Costing Share field is used to determine what percentage of the overall Work Order cost is allocated against the Route sheet item. For more information on costing share please refer to the advanced tab route sheet section of the work order detail topic.
Completed?
Check this flag to signify that the Route Sheet item is completed.
Completed Date
This is the date that the Route Sheet Item was completed.
Completion Comments
This free text field allows the user to enter completion notes regarding the Route Sheet Item.
Completing the work order
Once all data has been entered the work order can be completed by clicking the complete button on the form or selecting the complete option from the top menu bar. If any mandatory details are missing these will be highlight to the user at the top of the form.
The details entered on the form can be saved without completing the form by using the save function.