Checklists
Standing Data >> System >> Checklists
Checklists are a means of capturing specific controlled data. They are used on Work Orders both with agility and on mobile applications.
They provide a method of presenting the user with a series of pre-defined questions or checklist items, which the user completes as part of the work flow.
For example, these could be used to record that certain safety procedures had been carried out on a specific task, or to capture data on visual inspections or equipment checks that are not defined meter readings. For more information on implementation and usage please refer to the ‘Job Types’ and ‘Work Orders’ topics.
Checklists can be attached to Work Order types, which automatically attach associated checklists to the Work Order. Or alternatively checklists can be added to the Work Order directly from within the ‘checklists tab’ on the Work Order detail form. One, more or no checklists can be attached to a Work Order.
The checklists available for selection to Work Orders and Work Order types are pre-defined as Standing Data.
Each checklist is made up from a header definition which describes and identifies the checklist and items.
Checklist Header
When ‘checklists’ is initially opened the user is presented with a scan form listing all the currently defined list header information.
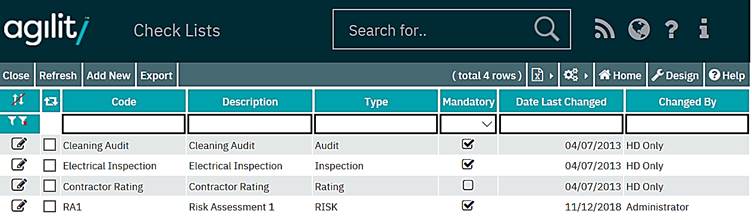
The header fields are defined as follows;
Code
This is a unique code to identify this checklist. It is a free text field but the code entered must be unique.
Description
Long free text description field providing a detailed description of the item.
Type
This is a category for identifying the type of checklist, i.e. ‘Inspection’, ‘H & S Checks’. It is currently a free text value.
Mandatory
A yes/no field to determine if the checklist must be completed by the user before the Work Order can be completed.
Last Changed By
The last date that the checklist was changed, if no changes have been made this will be the creation date of the list.
Changed By
The user login under which the list was changed or created if no subsequent changes have been made.
From this form, a new list can be created by clicking the ‘Add New’ option on the menu bar, or an existing list can be viewed or edited by clicking the drill down icon on the required list.
Both options will open the list detail form. A blank form will be presented in the event that ‘Add New’ is selected.
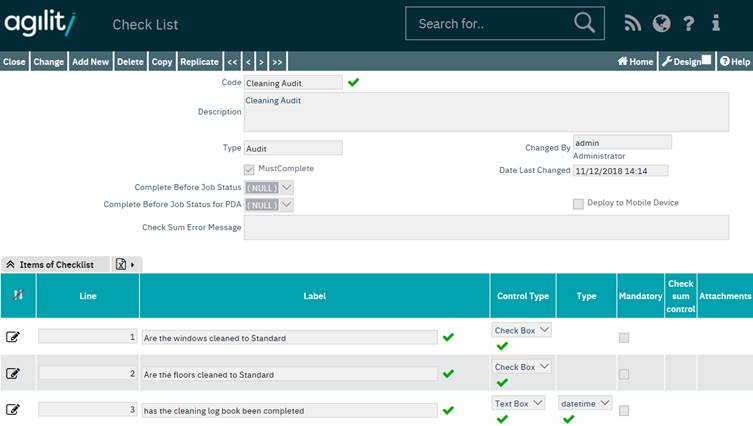
Above: Checklist form in detail mode.
The detail form shows the header values as shown in the scan plus some additional header information relating to the operational rules.
Complete before job status
This is the highest status within Agility which a Work Order with this checklist attached can reach before the checklist must be completed. The values are taken from standard Work Order status values.
Complete before job status (PDA)
This is the highest status on the mobile device which a Work Order with this checklist attached can reach before the checklist must be completed. The values are taken from standard Work Order status values.
Deploy to Mobile Device
If the checklist is to be sent to the mobile device with the Work Order this option must be enabled.
Checksum Error Message
This is the error message that will be displayed on the form if the checklist responses do not meet any specified checksum criteria. These are explained in list items below.
Checklist Items
A checklist can be made up of one or more items. Each of the items can be defined as a ‘checkbox’, a pre-defined drop down list of options or a text box which can be formatted in several ways (which are detailed below).
Any one or more of the checklists can be made mandatory which means this item has to be completed, filled in, before the checklist can be marked as complete.
In addition to the mandatory condition, certain types of item can be configured with a checksum value. This value enables checking that items using numeric values are filled in with values in a desired range.
The items on a list are initially displayed in the scan form on each list.
The list item can be added, edited or viewed in the scan or in detail mode by click in the detail icon on each item.
List Items Fields;
Line
This is a line number used to order the items on the list. When creating new lines this is automatically populated but can be overridden.
Label
This is the actual text or prompt of the checklist item, or the question. For example, ‘Was the power supply disconnected?’ It is a free long text value and is what will be presented on the checklist that is attached to the Work Order.
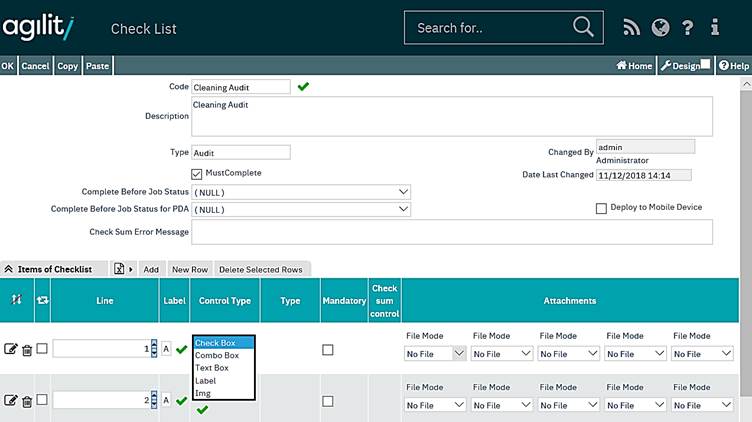
Control Type
The control type denotes the type of control that is presented to the user.
Check Box
A check box that is used to indicate a logical condition i.e. yes/no or true/false
Combo Box
This provides a drop down list that the user can select predefined answers from. This should be used where consistent data - especially if used for later analysis and reporting - needs to be recorded.
For example, where the condition of an item needs to be captured a list with the options, ‘Poor’, ’Fair’, ’Good’ and ’Excellent’ could be used. This eliminates potential variations in the captured data.
When the combo box option is selected an additional value is made available in detail mode in which to create the list of items.
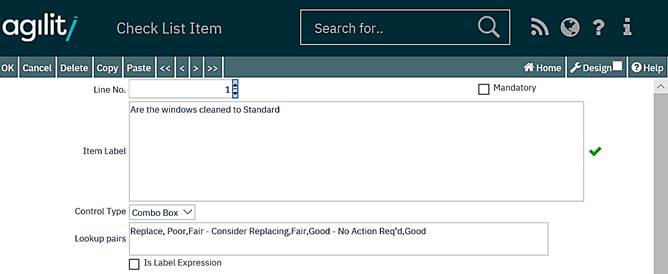
Each item in the combo box list is defined as a pair, comprising of a code and a description. The description is displayed in the drop down list. The code is used as an identifier and is also the value written to the attached Work Order checklist. The list is built up from pairs that are comma separated.
For example:
Poor - Replace,Poor,Fair - Consider Replacing,Fair,Good - No Action Req'd,Good
No text qualifier is required.
Text Box
This provides a text box that the user can freely enter data into. The text box can however be formatted in a specific way to control the type of data that is captured. When text box is selected a new value is made available in detail mode to select the format.
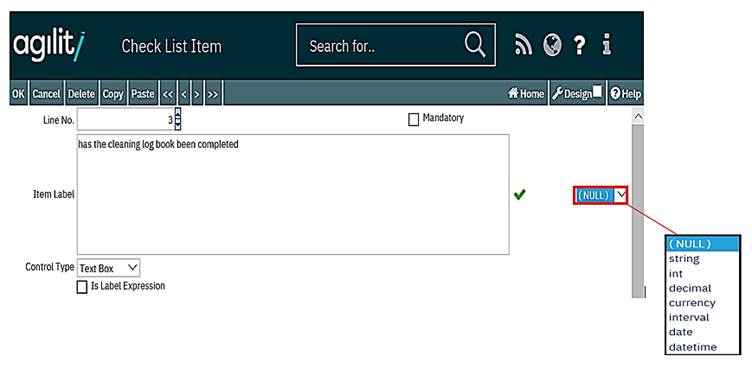
String
String values are general purpose free text fields where the user can enter any characters. This could be used to capture a free text description i.e. ‘The terminals are corroded”. When string is selected additional values are displayed on the detail form optionally allowing a minimum and maximum number of characters to be specified for the text value.
Int
Integer values. These are used for entering whole numbers i.e. 1
Decimal
These values are used for enter numbers that have a decimal value i.e. 1.11
Currency
This formats the text box for entry of monetary values
Interval
This formats the text box allowing entry of a time measurement in minutes.
Date*
Formats the text box for date entry
DateTime*
Formats the text box for entry of a date and a time
*Note both date and date time types will present a calendar selector on the value.
Mandatory
This flag denotes if the list item must be completed. A checklist attached to a Work Order will only reach a status of completed if all mandatory fields on the checklist have been completed.
Checksum Control
The checksum function provides a way of validating where items are counted into categories do equal an entered total value.
The checksum works by taking the sum of all the values marked as checksum element and subtracting from this all value that are marked as checksum total. If the result is zero, then the checksum will pass.
The following statement has to be true where for the checksum not to fail.

Where et is the total number of items marked as checksum element
And tt is the total number of elements marked as checksum total
So if a checklist had 2 checksum elements and 1 checksum total. Then the statement would be;

Or as shown in the below example:
The number of power connectors used, plus the number of power connectors unused, minus the total number of power connectors must equal 0. If the checksum does not equal zero, then one of the values must be in error.

Only certain text boxes with numeric formatting can be assigned a checksum control. These are Int, Decimal, Currency and Interval. When a text box with this type of formatting is selected an additional value appears in the detail form allowing a checksum control type to be selected. There are three options available.
No Checksum
This means that the value is not included in the checksum calculation.
Checksum Element
Denotes the value as a check sum element
Checksum Total
Denotes the value as a checksum total
If values are entered into a list that is using checksum values, if the checksum does not equal zero a checksum error will be displayed and the user will not be able to continue processing of the checklist form until the checksum is resolved.
Attachments
It is possible to add up to 5 different attachments per individual Checklist item. These are added in exactly the same way as any attachment in Agility, for details, please see the “Attachments” section of the Help file.