Work Order Log on/off
Work Order Logon/Logoff functions are provided to easily mark the Work Order and task the employee is currently working on. Once the Work Order or task is completed or suspended, employee can easily log off the currently assigned Work Order. Logon/Logoff automatically creates a labour transaction record and calculates the cost based on the time between logon and logoff actions.
Accessed from Work Orders >> Work Order Log on/off

When the Employee Work Orders scan is initially opened, it contains all Work Orders scheduled to the employee currently logged into the system as well as all work orders which have not been scheduled yet but with craft requirements appropriate to crafts assigned to the current employee. Default filtering in this scan form assumes that there is an employee assigned to the current login. If there is no employee assigned to the current login, no records will be displayed.
Logging On
The log on form is
accessed by clicking ![]() icon adjacent
to the required job.
icon adjacent
to the required job.

Field Definitions;
Labour
This is the code of the employee logging into the job. This field is filled in automatically based on the user currently logged in but it can be modified by hand.
Job, Equipment, Task, Craft
Those fields are automatically populated from the task record the Employee is logging into and they cannot be modified on the form.
Logon Date
Date and Time of the Login operation
Existing completion Comments
This text box contains details of any completion comments that may have been previously added.
“Logon” button
This button triggers “logon” action. If the employee is currently logged into another task, the error message “Employee is logged on to a different task” will appear on the screen and the logon process will fail, as the employee cannot be logged into 2 different tasks in the same time.
If this happens, employee should logoff first using other tasks first.
Logging off
“Logoff” button
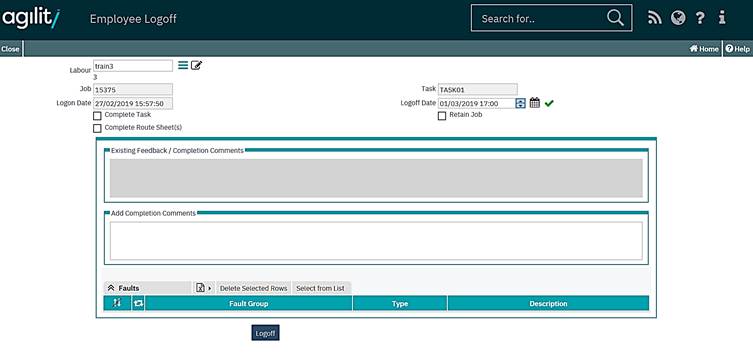
Logging off from a job is performed using the log off form.
Click on the log on/off icon adjacent to the required that the user is currently logged on to. This will open the log off form.

Labour
This is the code of the employee logging off the job. This field is filled in automatically based on the user currently logged in but it can be modified by hand.
Once the labour field is populated a proportion of the remaining fields are auto populated from the job.
Job and Task
Those fields are automatically populated from the task record the Employee is logging off and they cannot be modified on the form.
Complete Task check box
This field is provided to complete the selected task automatically when the logoff process is completed.
Complete Route Sheets check box
This field is provided to allow completing all route sheet items all together with the completing the task if Complete Task check box is checked.
Job Completion comments
This read-only field shows all completion comments entered so far in work order.
Add Job Completion Comments
This field is provided to allow the user to add some completion comments to the work order.
Logon Date
This is filled in automatically and displays the date and time at which this employee logged on to this job.
Logoff Date
This is the recorded logoff date and time. IT will default to now, but can be modified by the user.
Retain Job check box
This check-box is provided to allow suspending the task temporarily rather than releasing it for other employees to log on. When this check-box is checked and logoff button is pressed, the task remains scheduled to the same employee and the task status is changed to “LOGOFF”.
In cases where the check box is not checked and the logoff button is pressed, the task is being unscheduled and the task status is changed to “UNSCHEDULED”.
“Logoff from Task” button
This button will commit the log off data to the system and log the employee off from the job.
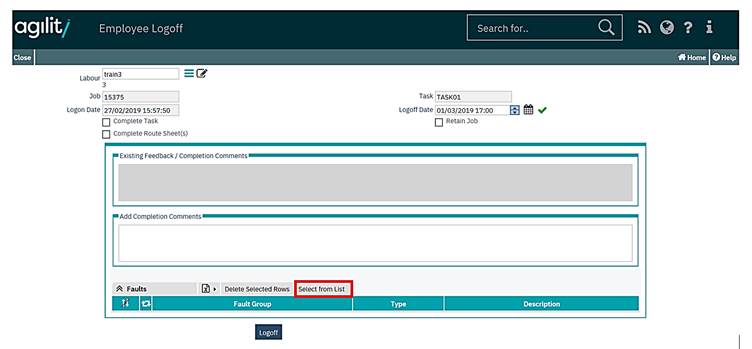
The log off form also contains a grid when any fault code can be additionally recorded prior to logging off. Any faults recorded here will be recorded against the work order.
To add one or more faults click the select from list button.

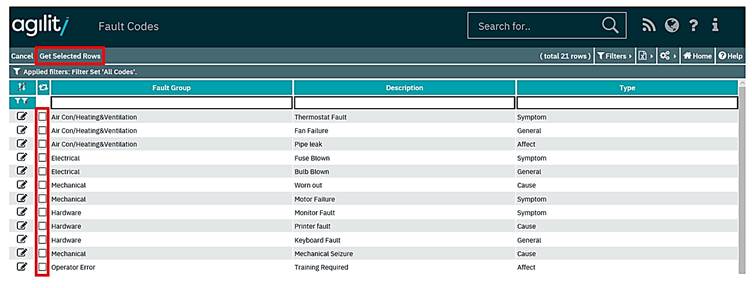
This will open a multi select grid of available faults that can be selected.
Click the check box of the fault(s) that need to be added to the work order using the selection check boxes.

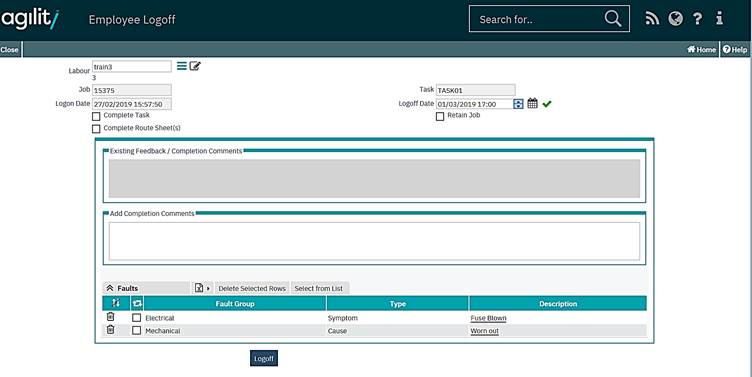
Once the selection has been made click the ‘get selected rows’ option to return the selected rows back to the grid.

If any selected faults need to be removed from the grid. They can either be removed at this stage by clicking the check box on the unrequired row and clicking the delete selected rows button, prior to clicking the ‘Log Off’ button. Or they can be removed from the work order later.