Work Order Detail
Individual work orders are viewed added and edited using the work order detail form. This can be accessed from ‘Add A New Work Order’ on the menu or from various main and inline scan grids using the detail drill down options.
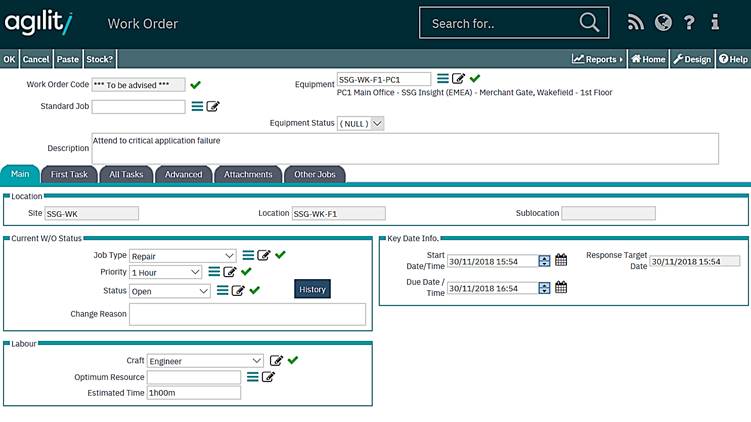
Above: Typical example of a Reactive work order detail form in creation mode.
Work Order Header Detail
Work Order
This field is read only and displays the Work Order Code. It is auto-generated when the work order is saved. The format of the Work order code is defined in the Sequence Definition for woJob.JobCode. Please refer to the Sequence Definitions section for details of how to amend the Work order Code format.
Equipment
This can be selected from the Equipment help Tree View or it can be input manually. This is a mandatory field. Work Orders cannot be created for equipment Items that have been taken out of service and have been flagged as obsolete.
Contract
This field is visible if system parameter "Contracting\ContractingInUse" = true and is automatically filled if all: StartDate, Asset, Craft and JobType are filled in and Contract has not been selected yet.
Description
This field is used to record a detailed explanation of the problem.
The remaining information that can be recorded onto a work order I then accessed via a series of tabs on the low pane of the form.
Main Tab
Location Box
Displays the Site, Location, Sub-Location (where applicable) for the Equipment that the work order is being raised against.
Current Work Order Status Box
Job Type
This combo-box is populated from the Standing Data file Work Order Types. This is a mandatory field.
If the Job Type selected is a Breakdown Job, then an additional box called ‘Breakdown’ will be displayed. This will allow the recording of a Breakdown date / time and Breakdown Reported date / time.
This information will then be used by the system to calculate equipment down time. The Breakdown date / time and Breakdown reported date / time must be entered before a Breakdown Work Order can be created.
Priority
This combo-box is populated from the Standing Data file Priority Codes. This is a mandatory field
Status
This is used to specify the current status of the work order. The work order Status combo box shows only those statuses that have been set up in the System Parameter “InitialStatuesList”. This is a mandatory field.
Status Change Reason
If the status is changed then the field Status Change Reason must be filled in if the parameter StatusResReq has been set (see System Parameters). By default, this option is set to mandatory. Changing the status creates an entry in the Status History. Please refer to the section enquiring on Work Orders for details of how to view the work order status history.
Craft
Select the Craft required to carry out the work form the Craft drop-down list.
Optimum Resource
Selecting the Optimum Resource will change the Work Order Status to Scheduled. However, this indicates a preferred labour resource. This will be shown in the scheduler, but it will still be possible to schedule the task to someone else.
The Resource can be entered manually or selected from the help form.
Estimated Time
This is the estimated time that the task should take to compete. This duration is used in the Scheduler when scheduling the task to a Labour Resource.
At this stage the work order could be saved and a Work Order Number generated. The details entered into the Craft, Optimum Resource (Employee) and Estimated Time fields are used to automatically populate a task (entitled TASK01).
This task can then be scheduled to Labour within the Task Scheduler. However, if a more complex Work Order is required, then the All Tasks grid can be used to define multiple detailed tasks.
Breakdown Dates Info
If a work order type that is marked as a breakdown is selected then additional date options become available.

These dates are used for recorded and subsequent analysis of breakdown repairs, specifically in items such as MTBF and MTTR reports.
Breakdown Date
This is the date and time that the break down occurred.
Breakdown Reported
This is the date and time that the breakdown was reported.
Repair Started
This is the date and time that the repair work actually started.
Repair Completed
This is the date and time that the repair work was actually completed.
On Line
This is the date and time that the equipment was brought back on line. This can be different to the time the repair was actually completed dependant on procedures and protocols that may be in place.
By default none of these fields are mandatory.
Key Date Info Box
The dates within the info box will change dependant on the priority selected on the work order. If the priority has got response target, response threshold or completion threshold values set against it then the response and completion target and threshold values will be displayed.
These are detailed below. (Response and Completion Targets and Thresholds)

Start Date / Time
On creation of a work order this will default to the current day and time. This can be manually adjusted.
Due Date / Time
If the selected priority has been set up with a ‘Due Time’ then the End Date / Time will be calculated based on the Start Date / Time and the Due Time. The Start Date / Time can be manually adjusted, the Due Date / Time will then recalculate.
Completion Date / Time
This field is read only. It records the date and time that the work order was completed
If the Work order is to contain only a single task, then the Craft, Optimum Resource (Employee) and Estimated Time fields can be populated. Otherwise, ignore these fields and use the All Tasks Grid.
Response and Completion Targets and Thresholds
These following three fields are not mandatory, are automatically calculated by the system and can be used to produce KPI charts and scan forms that can display work order status conditions, i.e. a work order is approaching due date time or a work order has not been responded to within the target time, or the work order response target is approaching.
These can then be used to assist in prioritising work load to ensure that SLA targets are met.
Response Target Date /Time
If the priority selected has got the Response Target field populated, this date will be automatically calculated as the current date/time plus number of minutes filled in the Response Target field.
Response Warning Date /Time
If the priority selected has got the Response Threshold field populated, this date will be automatically calculated as the Response Target minus number of minutes filled in the Response Threshold field.
Completion Warning Date /Time
If the priority selected has got the Completion Threshold field populated, this date will be automatically calculated as the Due Date minus number of minutes filled in the Completion Threshold field.
Automatic Date Changes
The responded at and repair started at dates are modified automatically when any of the following transactions occur against the work order.
When an employee logs on to a work order (Agility)
Status update to ‘Arrived on Site’ (Mobile Expert)
Status update to ‘Arrived’ (Mobile Lite)
Manual time entry against the work order (Agility)
The date will be modified in the following way;
Responded At Date: If the date in responded at is null or is after the date of the transaction listed above, the responded at date will be set to the transaction date. If responded at date is before the transaction date it will remain unchanged.
Repair Started Date: If the date in repair started at is null or is after the date of the transaction listed above, the repair started at date will be set to the transaction date. If repair started at date is before the transaction date it will remain unchanged.
First Task and All Tasks Tab
The first task tab contains details of the primary work order task; in the event that the work order is using multiple tasks then this will be the first task.
If multiple tasks are used then all work order tasks can be accessed from the all tasks tab. The first task tab opens the task detail sub form directly, as shown below.
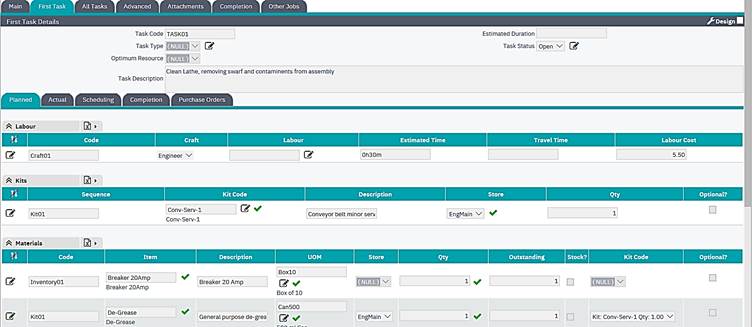
Example task Detail form
The all tasks tab open a grid that lists all tasks. From which each individual task can be drilled into.

When a task is drilled into using the view detail icon the task detail form will be opened for the selected task. A overview of the task detail form is given below.
Task Detail Form; (Also shown in the above screen capture)
This sub form is split into a header and a tabbed section. The header detail contains information on the work order task.
Tab Sections
Each tab contains sections relevant to the selected task.
Planned Tab
This contains grids that show the various planned labour resources, material and other costs expected to be incurred on this task.
Actual Tab
Like the planned tab this grid contains details of labour resources, material and other costs but is where the actual usage is recorded.
Scheduling Tab
This shows which employee has been scheduled to which task, the status of the task and labour activity in terms of logging on to and logging off from a task.
Completion Tab
This is where the task completion details are recorded.
Purchase Orders
This shows details of any purchase orders that are associated with this task. For more information on direct purchase please refer to the purchasing chapter.
Advanced Tab
The advanced tab provides access to extended work order functions each of the functions is accessed via a sub set of tabs.
E-Mail Tab
E-Mail recipient addresses can be manually added to a work order. These can be used to trigger a mail to be sent to notify a contact of events occurring to the work order, such as a status change. These fields are additional to those specified against the Equipment Record.
Notifications are generated based upon triggers set against different criteria, i.e. if a work order status has a notification action specified then when the work order is changed that status a notification will be automatically sent to the listed recipients.
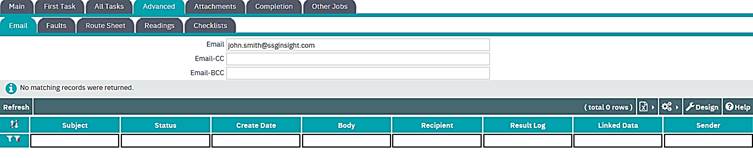
The lower half of the form contains a log of mail notifications that have been sent.
Faults Tab
Any fault codes recorded against the work order can be viewed or edited and additional ones added here. These fault codes are used for subsequent analysis in charts and reports available in other areas of the system. Faults can be recorded against a work order, using the log off, work order completion forms or manually through the work order detail form here, when in change mode.

To manually add faults using this form when in change mode, click the new row option at the top of the grid and select the required options from the drop down selection lists. Or alternatively, click the select from list option. This will open a multi select grid of available faults that can be selected. Click the check box of the fault(s) that need to be added to the work order using the selection check boxes.
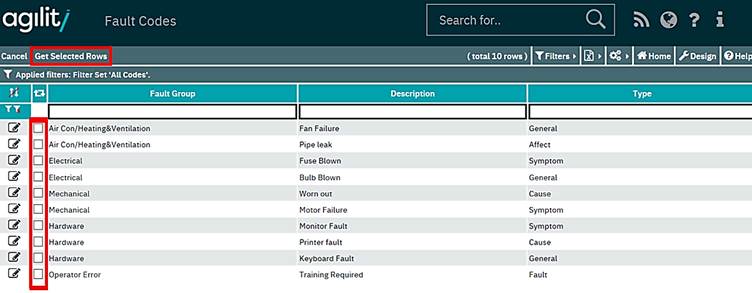
Once the selection has been made click the ‘get selected rows’ option to return the selected rows back to the grid.
To remove any individual recorded faults click the delete icon on the row of the unrequired fault code. Alternative select the unrequired rows by clicking the ‘select’ check box for that item Then click the delete selected rows option at the top of the grid.
Route Sheet Tab
In circumstances where the same task is to be performed across a large number of equipment items, instead of creating one work order for each equipment item, use of a route sheet may prove more efficient.
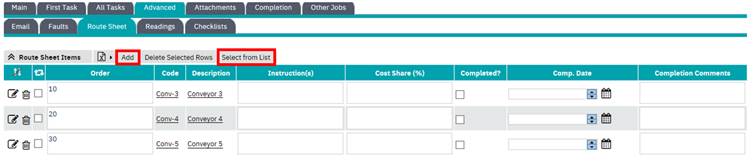
A route sheet is simply a list of equipment items where the same tasks as described on the current work order need to be carried out. These are normally used for planned maintenance tasks. The list of items is accessed suing the route sheet tab.
Since route sheets are usually applicable to planned maintenance tasks then the list of equipment items is usually defined against the appropriate PPM schedule, the list is then used when the work order is created. The list would then be visible here.
However items can be manually added to the work order route sheet manually. Items can be added individually or by means of selecting multiple items from an equipment selection list.
The add function on the grid will allow addition of a single item via a detail form. The select from list option will open the selection list for the addition of multiple items, which can then be subsequently edited either within the grid row or by drilling into the detail form on each item.
Each route sheet item is made up from the following information;
Equipment
This is the equipment code of the item to be added to the list.
Instructions
Any additional instructions applicable to this specific item can be added here.
Item Order
The Item Order will be generated automatically however this can be manually adjusted to record the order in which the route sheet items should be dealt with.
Costing Share
The Costing Share field is used to determine what percentage of the overall Work Order cost is allocated against the Route sheet item. This is an integer field and does not allow decimal values. However it should be noted that that costing on route sheet items is subject to the configuration of system parameters and the value specified here may not be used dependant on configuration. This should be clarified with your system administrator.
The parameters are defined fully in the Standing Data chapter under system parameters. They are located in this path ‘ProcesMngt\RouteSheet’ and are called ‘LabourCostCalcType’, ‘MaterialCostCalcType’ and ‘OtherCostCalcType’.
*In the below definitions; ‘Overall work order cost’ refers to the overall work order cost applicable to the parameter.
LabourCostCalcType Overall Labour Cost
MaterialCostCalcType Overall Material Cost
OtherCostCalcType Overall Other Cost
Each parameter can be configured with one of the following settings;
BasedOnProportion
The percentage proportion of cost specified in the costing share on each item will be applied to that item. The cost assigned to the main equipment item which the work order has been raised against will be 100 % of the overall cost minus the sum of all cost proportions applied to list items.
For example;
If there are 2 route sheet items, one with costing share set at 35% and the other set at 25% and the overall cost of the work order was £1000.00. The costs would be allocated in the following way.
Main Equipment Item £400.00
First Route Sheet Item £350.00
Second Route Sheet Item £250.00
NoSplit
All costs incurred against the work order will be allocated against to the main equipment item. No costs will be applied to any route sheet items.
AllocatedToEach
The overall cost of the work order will be applied to each item on the route sheet as well as the main equipment item. For example if the overall cost of the work order was £500.00 then £500.00 will be allocated to the main equipment item and each route sheet item.
EvenlyAllocated
The overall work order cost will be evenly divided across the main equipment item and each of the route sheet items. The cost applied to each item is calculated by the overall cost of the work order divided by the number of route sheet items plus 1.
Overall Work Order Cost / (Number of Route Sheet Items + 1)
For example if there are 2 route sheet items, and the overall cost of the work order is £900.00 then £300.00 will be allocated against both route sheet items and the main equipment item.
Completed
This checkbox indicates if all tasks on the work order have been completed against this route sheet item. A checked state indicates complete.
Completion Date
This is the date that the tasks were completed against this particular route sheet item.
Completion Comments
Additional completion comments applicable to the completion of tasks against this route sheet item
It is not essential to complete all route sheet items to be able to complete the work order. If there are incomplete route sheet items when the main work order is completed then a warning message will be displayed allowing the completion process to be cancelled and the route sheet data to be amended.
Readings Tab
Any meter reading points associated with any of the equipment items specified on a work order, either as the main equipment item or route sheet items will be accessible from the readings tab.
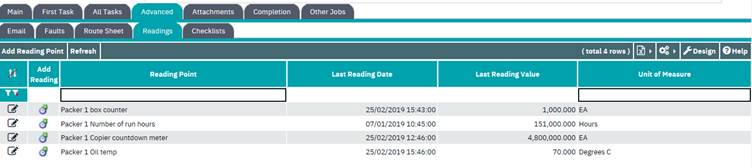
Reading taken during the execution of the work orders tasks can be recorded against the equipment item directly from here. The grid is same as the one used for normal readings entry. Detailed information on how to add readings using this grid can be found in the Equipment chapter under the ‘adding readings’ topic.
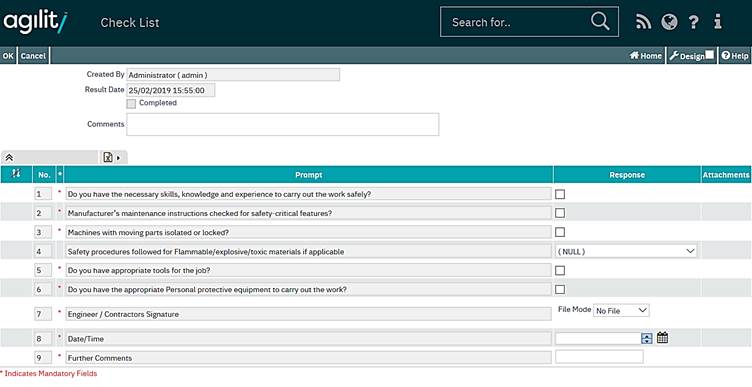
Checklists
Checklists are items that can be attached to a work order and are used to capture data using pre-defined questions or prompts. One or more checklists can be attached to a work order. The checklists are pre-defined in the system, for more information on defining checklists please see the Checklists and Work Order Types topics in the Standing Data Chapter.
Checklists can be completed from within agility or from a mobile device, if the checklist has been configured to deploy to mobile devices.
Checklists can be added to a work order manually or are automatically added if the work order type used has checklists attached.
To manually add a checklist to a work order, first select the required checklist from the drop down list of available pre-defined checklists. Then click the ‘create new checklist’ button.
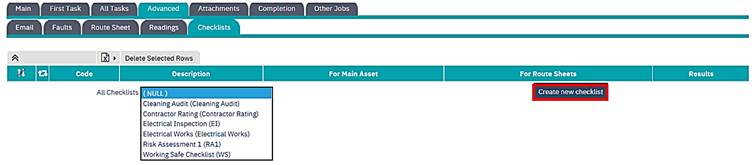
A new check list will then be added to the work order.

To fill in the checklist click the add button located in the results grid adjacent to the required checklist.
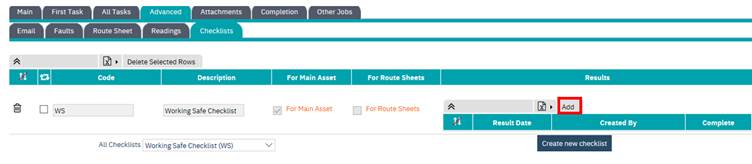
This will open the checklist in a new form. Each checklist consists on a simple header and a series of prompts or questions.
Header Values;
Created By
This is the user who entered the data. This will be automatically populated with the currently logged on user details.
Result Date
This is the date and time that the data was entered.
Completed
This flag is controlled by the system and will only complete when all mandatory items on the checklist have been completed. Mandatory items are marked with ‘*’. Dependant on the configuration of the checklist it may not possible to progress the work order to the next status in the work flow until the checklist has been completed.
Comments
This can be used to record any additional comments in relation to the results.

Below the header detail is a grid containing the check list pre-defined prompts or questions.
Data should be entered in the result column of the grid. The number of items, type of items and type of data that can be entered is determined by the pre-defined checklist. A sample checklist is displayed below.
Some checklists can be configured with a checksum validation. More information on this can be found in the Checklists topic of the Standing Data chapter.
When data entry has been completed and ok has been clicked, if the form returns a checksum error. The data entered should be checked for validity.
Each checksum field involved will be indicated and the form cannot be saved until the checksum error has been resolved.
Attachments Tab
This tab contains a grid listing any files that have been attached to this individual work order. Files can be pre-attached to the work order if the work order was created using a standing job that has attachments defined or if the equipment item that the work order has been raised against has files attached. Additional files can be manually attached using this grid. These for example could be risk assessments, captured images, schematics etc.

Attachment
This is the physical file name, which is displayed as a hyperlink. The file can be downloaded and / or viewed from the system by clicking this hyperlink.
Auto Print
If this flag is checked then the attachment will be automatically printed with tis work order.
To manually attach a new file, click the ‘add’ option at the top of the grid. The file attachment method is the same as described in the Common Functionality chapter under the ‘Attachments’ topic.
Other Jobs Tab
The other jobs tab contains a sub set of tabs that have information on works orders and planned maintenance schedules that exist against the main equipment item on the work order as well as information on linked jobs.
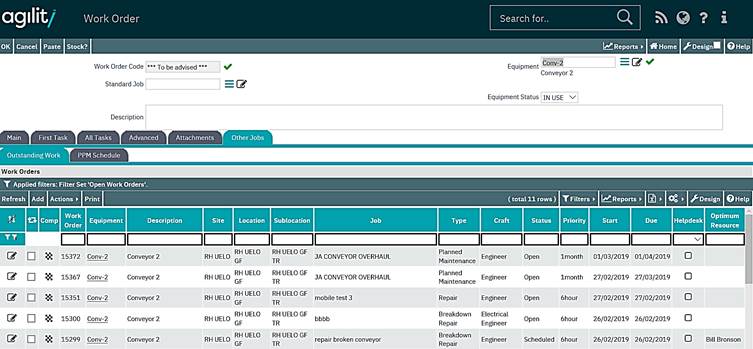
Outstanding Work Tab
This tab contains an in line version of the standard work order list form that contains a pre-filter so that it only shows any other outstanding work orders that have been raised against the main equipment item in the current work order. The operation of this grid is the same as described in the ‘Work Order List’ topic within this chapter. This grid allows a user to see if there are other outstanding works for the current equipment items that could be carried out at the same time as this work order.
PPM Schedule
Within this tab a grid that details any PPM schedules that are defined against the main equipment item on the work order.
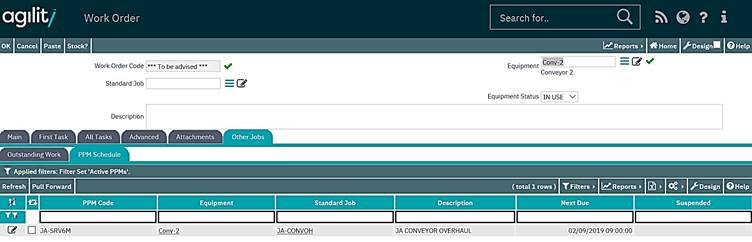
From here the user can view, manipulate and ‘pull forward’ any of the defined PPM jobs so that planned maintenance work can be undertaken at the same time as the current work order. For more information on the use and implementation of PPM schedules please refer to the ‘Standing Jobs’ chapter.
Associated Tab
This provides a method of creating an association between 2 or more jobs and viewing any currently associated jobs. Associating jobs provides, for example, the user with a view of any other work currently being undertaken that may have implications this particular work order.
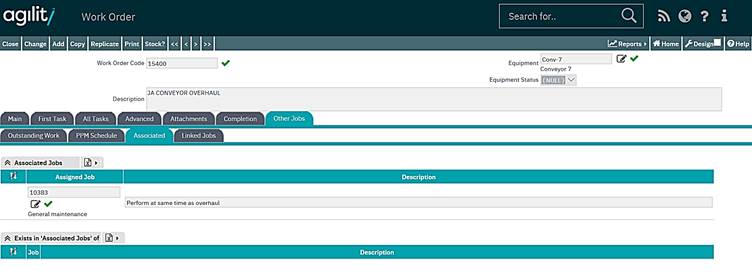
The form is divided into 2 grids.
The upper grid shows that have been added as associated jobs to this work order. New job associations can be created here by clicking the ‘new row’ function at the top of the grid. To link another existing work order the user just needs to enter or select the work order number. Additional comments relevant to the association can also be added.
Field Definitions;
Associated Job
The is the number of the associated work order
Description
This is a free text description of the association.
The lower grid shows a list of any work orders which the current work order has been added to.
Field Definitions;
Associated Job
This is the number of the associated work order which the current work order has been added to.
Description
This is a free text description of the association.
Linked Jobs Tab
The link jobs tab is similar to associated jobs but jobs, but in this instance it forms more of an audit trail of ‘follow on’ jobs. The tab is divided into 2 grids, the upper shows any previous jobs, if existing, that this job was created from, the lower shows if a follow on job has been created from this job.
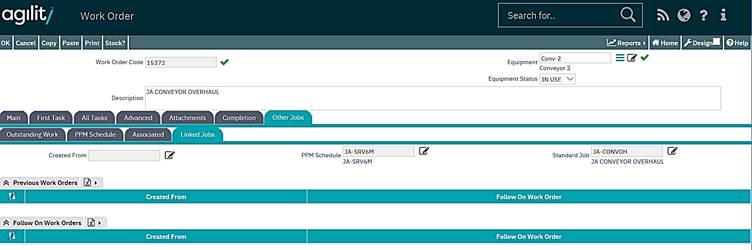
The grid columns simply detail the linked work order numbers. A detail icon is provided to view the full detail.