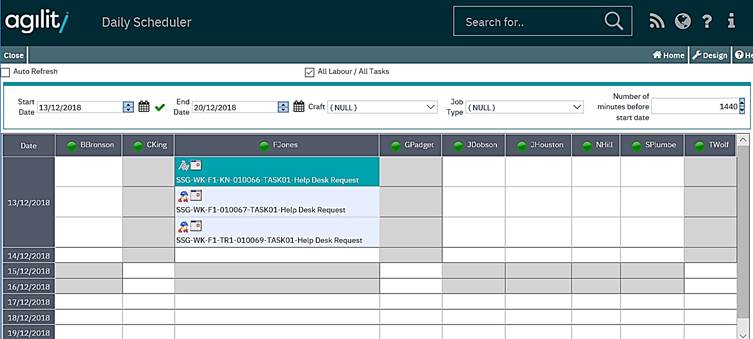
Daily Scheduler
Scheduling > Daily scheduler
The daily scheduler is effectively a work planner.
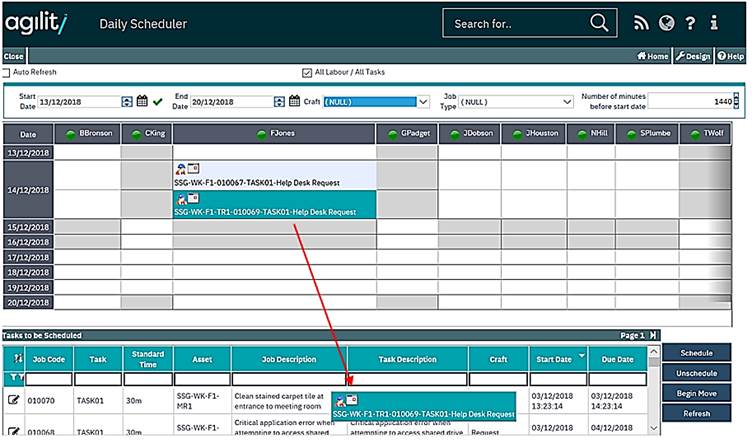
The screen is split into two panes. The top half shows the planner grid with filter options. Each column represents a labour resource, showing the available working hours based upon the shift pattern.
Each row represents a day.
The dates shown will depend up the start/end date range selected.

The lower pane displays a grid containing a list of unscheduled tasks; these are tasks that have not yet been allocated to a labour resource.
Since this grid shows tasks for work orders containing more than one task the same work order number will be repeated in the grid, but for each different task.
The grid operates in the same way as a standard scan form in terms of column sort, drill down and column filters.

Within the scheduler grid, below each labour resource name is a ‘traffic light’. This indicates the availability of that labour resource.
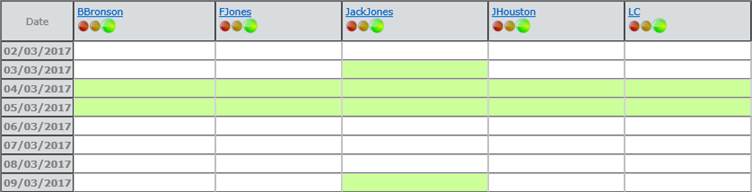
When allocated work load for the specific labour resource is low, i.e. they still have a lot of time available based upon the available hours the indicator will show green. As the workload increases the indicator will turn to amber and then red.
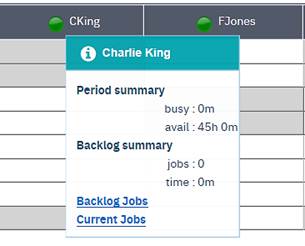
Moving the mouse over the indicator will provide a tooltip summary of the current work load for the labour resource.
Scheduling a task is done using a drag and drop technique. The selected task is ‘grabbed’ from the tasks grid by selecting it by clicking on it and holding the left mouse button.
Whilst continuing to hold the left mouse button the task is then dragged to the required slot on the scheduler grid and the left button is released which will drop the tasks onto the selected slot.
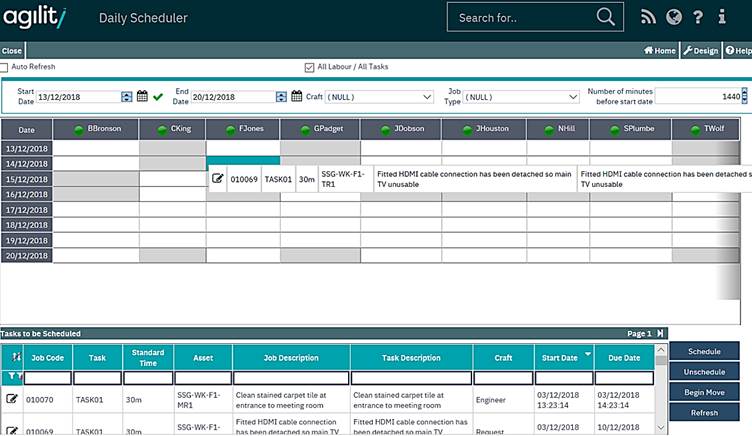
When the task has been allocated it will appear in the grid.
When additional tasks are added to the labour resource they will also appear in the grid. The text displayed is a hyperlink and clicking on this will take you straight to the task detail screen.
A task can be un-allocated from a labour resource by performing the reverse action of allocating.
The tasks is selected and grabbed from the scheduling grid, dragged and dropped back onto the tasks grid.
This action will unallocated the task and allow the task to be allocated to a different labour resource.
Tasks can also be moved between labour resources within the scheduler grid using the same drag and drop technique.
This action will remove the task from the previous labour resource and reallocate it to the new selected labour resource.
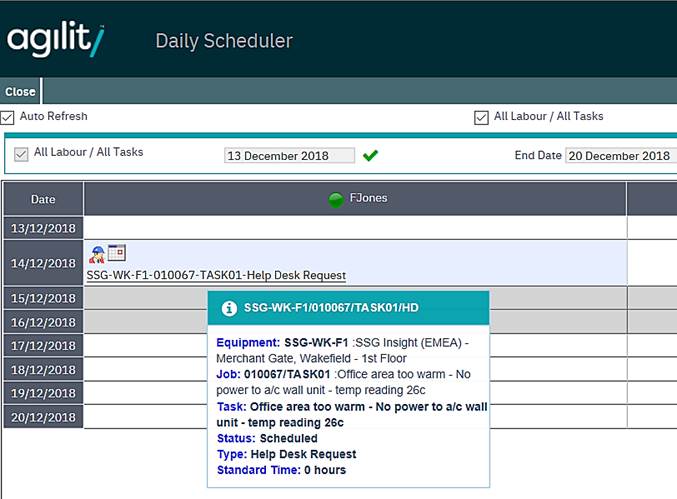
If the mouse is moved over an allocated task a summary of the task details is displayed as a tooltip.
Each displayed labour resource name is also hyperlinked and clicking on it will display the labour resource detail record.

During the scheduling process if an illogical action is performed the user will be prompted with a question. The question will indicate the nature of the issue and prompt for what action to take.
For example if you attempt to schedule a task where the due date of the job/task is before the date that you are attempt to schedule it for, a question will be generated.
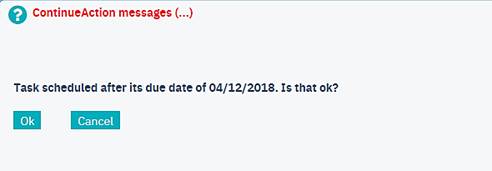
At this point it is necessary to resolve the query before any further scheduling can take place. Clicking ok will continue with the attempted action. Clicking cancel will cancel the attempted action.
The scheduler also contains additional filters to assist with focussing the scheduler grid and un-allocated tasks grid on specific crafts or job types.
These are located at the top of the scheduler pane.

To select a craft and/or job type click on the appropriate drop down list and select. To apply the filter click the refresh button located at the bottom right of the screen.
The ‘Number of minutes before start date’ will filter out all tasks with a start date that does not fit within the selected number of minutes. In other words, only the tasks which are due to start within ‘Selected number of minutes’ from now will show in the list of tasks available for scheduling.
The default value for ‘Number of minutes before start date’ field is defined in system parameters under “ProcessMngt\Scheduler\NumberOfMinutesThreshold”
The filter can also be applied by automatically by selecting the Auto refresh tick box in the top left of the screen.
Within the same filter tool bar is a start and end date range. These dates are automatically populated to reflect eight days from the current date.
Each one can be changed to either reduce or increase the period shown in the Employee/Date covered grid towards the end of the screen display.
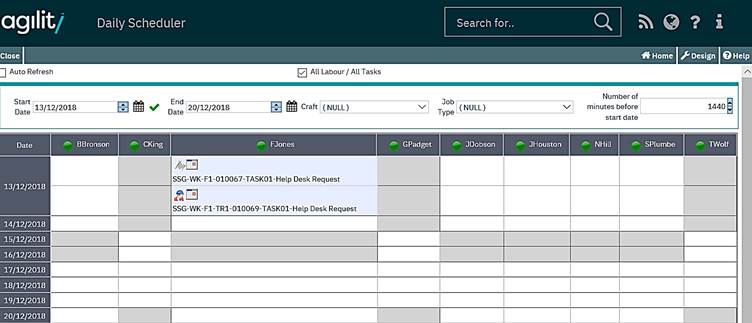
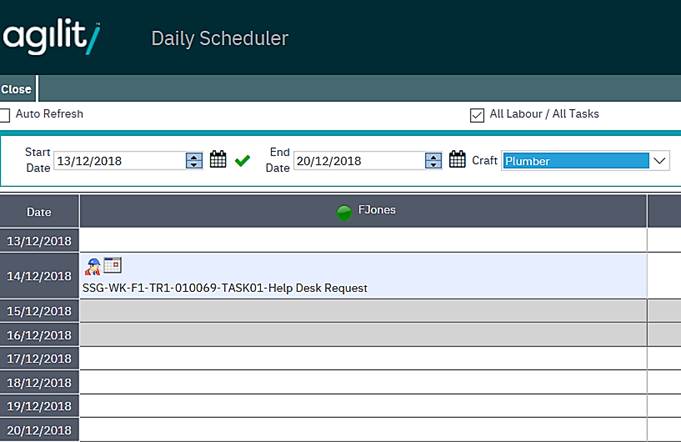
For more space utilisation, the daily scheduler can be configured to show a maximum number of completed tasks per labour resource per day. T
he maximum number of completed tasks can be defined in the following system parameter “ProcessMngt\Scheduler\CompletedTasksIncluded”
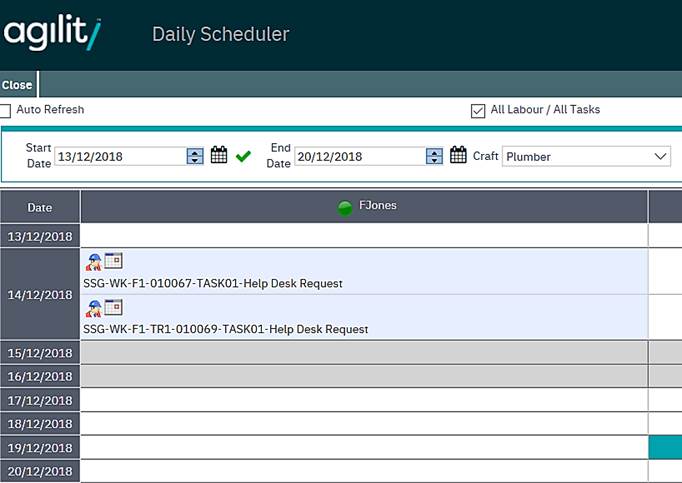
In this example, the maximum number of completed tasks is set to 1 in the system parameter, the scheduler will show the most recent completed task per labour per day plus any outstanding tasks.
When work order 10067 is completed, the scheduler updates to show work orders 10067 & 10069. Work order 10066 will disappear from the list.